Stylelist Home is proud to present a project-a-day from the fabulous new book This Old House Salvage Style Projects.
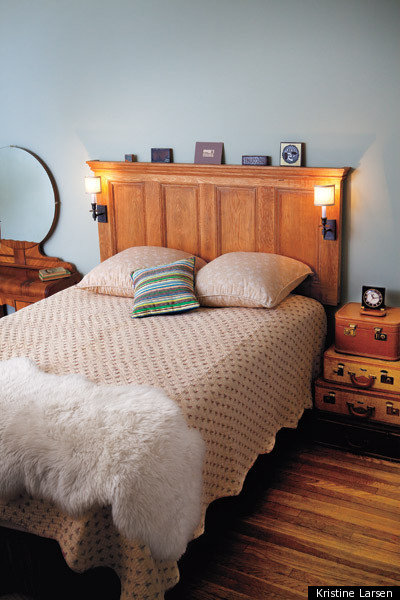
From afar, it's impossible to tell that this Craftsman-style headboard was made from a door found at a salvage yard. Headboards create an instant focal point in a bedroom and this DIY one has a hand-carved look that really gives it extra character. Make sure to consider the style and height of the door before you commit to one. Symmetrical rectangles will make the finished piece look polished and even.
TIME: 1 dayCOST: $375SKILL LEVEL: Difficult
SUPPLIES:Paneled wood doorSconcesSolid crown moldingPencilSafety glassesWhite craft glueN100 Finishing nails4D Finishing nailsBeeswax PolishLint-free Cloth
TOOLS:Tape measureCombination square Circular sawLarge steel rulerClampsHammerPutty knifeRandom-orbit sanderWet-dry vacBrad nailer (optional)Drill/driver3/8-Inch paddle bit
Step 1: Measure your door. Consider mattress widths to determine how much you'll need to trim off of the door. A twin is 39 inches wide, a full is 54, a queen is 60, and a king is 76. Allow a few more inches if you want to add sconces, as I did. Use a combination square to mark the cutlines.
Step 2: Trim it to size. Use a circular saw to cut your door. To create a guide for the saw to follow, place a steel ruler alongside your cutlines and clamp it to the door.
Step 3: Patch holes. Fill the void in the edge of the door where the lock used to be by tapping in a wood scrap. To fill surface holes, make a putty out of sawdust and clear-drying white craft glue. Blend until it's the consistency of creamy peanut butter, and spread with a putty knife. Step 4: Sand the surface. For stripped doors, remove splinters and round over rough edges with a random-orbit sander that's hooked up to a wet-dry vac to limit dust. For painted ones, first remove the old finish with an eco-safe gel stripper; dry stripping can release lead dust into the air. Step 5: Create the crown for the top.Mark the length of the door's face on a strip of solid crown molding. Cut to size, mitering ends at 45-degree angles (a). Use the offcuts to create decorative returns for the door's outside edges, giving the top a finished look (b).
Step 6: Secure the crown. Squeeze a bead of glue on the crown's back and press into place. Reinforce the bond by tapping in finishing nails about every 6 inches. I used a brad nailer to speed the process.
Step 7: Seal the wood. To restore the door's luster and highlight the grain pattern, use a lint-free cloth to apply a natural beeswax polish. Then buff it with a lint-free cloth to impart a soft sheen. Recoat and buff periodically to keep up the finish.
Step 8: Install the sconces. Mark where you want the fixtures to be. Fit a drill/driver with a paddle bit, and bore holes through which to fish wires. Secure the sconce backplates to the door using the screws provided, and hook up the lights. Now hang your new headboard, fluff up your pillows, and take a well-deserved break.
This project is from the new book This Old House Salvage Style Projects.