
Christine Schmidt is a queenpin in the DIY world. Her business, Yellow Owl Workshop, started humbly with made-to-order greeting cards printed in her Brooklyn apartment. Now, from her studio in San Francisco, Schmidt cranks out stamp sets, party kits, cards, stationery and jewelry that can be found in stores like Urban Outfitters and Madewell.
Schmidt has spent endless nights at the drawing board. But even business owners have lives, and when Schmidt and her husband decided to have a daughter, something had to give. "Running your own business and having a kid are actually quite similar in that they take up all of your time and you're never really off," she told The Huffington Post.
Instead of putting the business on hold, Schmidt switched gears and made time with her daughter the focus of her new business venture: Yellow Owl's Little Prints, a book of projects to make for kids. Once Emmy was born, her room was adorned with paper mobiles, stamped sheets, a custom rug and an elegant name banner -- all projects that are now featured in the book, out this month.
"All these things share three important components," wrote Schmidt in the book. "They are handmade, practical and meaningful."
Schmidt sat down with The Huffington Post to talk motherhood, owning a business and how to make the ultimate holiday card.
What have been some of the challenges being a mother and owning a small business? There are only so many hours in the day and you have to prioritize. I really struggled with letting people help, but you have to learn when to fire yourself.
What inspired you to write the new book? You get a bunch of junk when you have a kid -- a lot of plastic stuff without much meaning. I only make things that I want and I wasn't finding what I wanted. I wanted to give people projects that were accessible, meaningful and useful.
Your first book was pretty advanced, but most of these projects are pretty simple: stamping, stenciling, etc. At the end of my pregnancy and right after Emmy was born, I was forced to work from home where I didn’t have a big studio with supplies. I was just using what I had on-hand. But this ended up translating well -- everyone else reading the book is working from their kitchen table, too. So these are really meant to be handy projects that you can do at home with things you already have.
Did you find your priorities changed when your daughter was born? Absolutely. Once you get pregnant, you have a hard time thinking of anything else. Babies have their own schedule, and for people who can't take time off to be with them, that can be really heartbreaking. I was so fortunate to have a support system and a job that allowed me to do both. When Emmy was first born, you couldn't have paid me a billion dollars to care about my business.
Any advice for new mothers in business? I have the same advice for caregivers and small business owners: forget both of those things, even if just for 30 minutes. Spend sometime with the person you were before. Watch garbage TV, go out with friends, get into ebay bidding wars over kilim rugs, broken Imari china plates and agate wind chimes. OK, that's just me but I am a happier, more effective and tolerable mom and boss when I remember that sometimes I can be neither.
Want to get crafty this holiday season? Use Schmidt's instructions below for customizable wrapping paper, tags, gift cards and whatever else you can imagine:
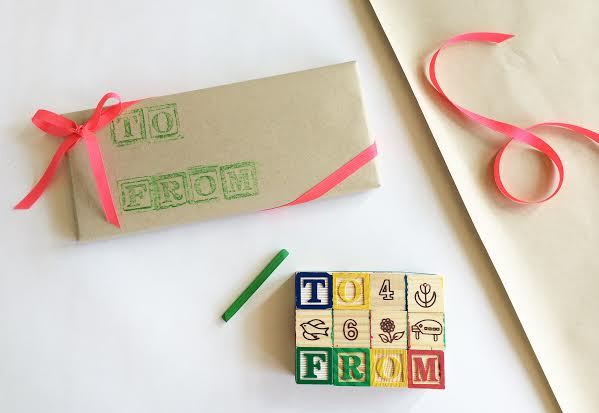
MATERIALS
Set of wood alphabet blocks
Large rubber band, approximately 3½" x ¼"
(9cm x 6mm) or elastic tie
9" x 12" (23cm x 30.5cm) sheet of vellum or construction paper
Colored pencil or crayon
INSTRUCTIONS
1. Arrange alphabet blocks face-up to spell out the greeting, word or name.
2. Rotate extra blocks so the flat side is up and place them around the perimeter of the word.
3. Secure the blocks together with a rubber band.
4. Place vellum or paper over the blocks. Put one hand on the blocks to secure the paper to the blocks. Use a colored pencil in the other hand to rub the raised surface of the blocks.
5. Repeat steps 1–4 as needed for additional words or names. Align the paper below the first line and rub with the nib of a colored pencil.