There are many traditional foods from the South that have been adopted all over the country. You can get biscuits at any hour of the day in NYC. Soul food can be found as far west as Portland. But grits, that dish of cornmeal, hasn't taken off with the same enthusiasm as others -- we suspect it's because they're not as easy to make right. We came across an in-depth and easy-to-follow guide in Sean Brock's recently released cookbook, Heritage, that makes us think grits should be given another chance.
The thing with grits, like with cornbread, is that they have to be made just so to taste really great. Of all the great Southern chefs, the James Beard Award winning Brock (of Husk in Charleston and Nashville) makes us feel like we can master this dish no matter where we come from. Here's what he had to say on the matter:
Excerpted from Heritage by Sean Brock (Artisan Books). Copyright © 2014. Photographs by Peter Frank Edwards.
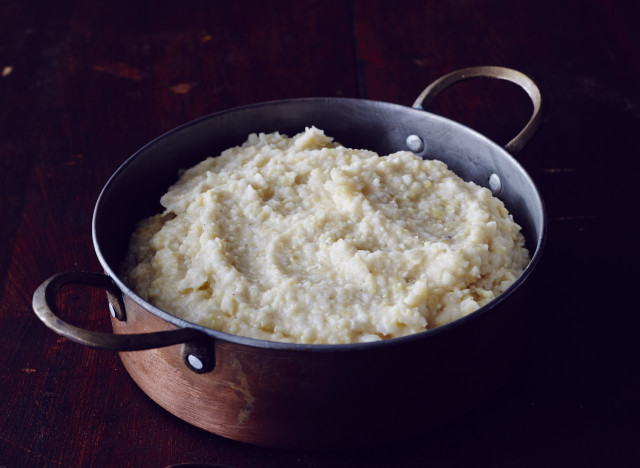
Grits have played an important part in the history of the South because corn was a crop that could be grown easily in the region and dried and stored for winter consumption. A bowl of grits can tell the story of a region, a family, or a time period. Most regions in the South have a favored variety of corn with historical reference of some sort. Some people like their grits very thick; others prefer them very fine and soupy. Some use milk; some use water to cook them. Some have them for breakfast only and would never eat them for dinner. But in some places, like in the Lowcountry, people have been known to consume grits at three meals a day.
When I was a kid, I didn’t love grits the way that I love them now. Where I grew up, we didn’t have a mill and the grits I ate came from a box. I liked them just fine, but I wasn’t in love with them. These days it’s a different story. I remember the first time that I tasted grits freshly milled from heirloom corn and slowly cooked on the stove with care. It was a revelation, one of those moments where you realize how much you have to learn. Few things make me happier than a bowl of grits. Anytime I travel out of the South I find myself craving grits; they are my go-to comfort food.
Everyone has their own way of cooking grits. To be honest, the way I cook grits changes almost every time I cook them because each bag of grits cooks differently. It all depends on a few variables: the variety of the corn, the freshness of the grits, and the coarseness of the grind.
The particular variety of corn used plays a role too. It’s important to know what the starch and sugar contents are. Each variety of heirloom corn has a different starch content -- dent corn has less starch than flint corn. Corn that has a high starch content will need more water in order to hydrate properly. Corn with a high sugar content will need less butter before it goes on the plate. I’ve also found that the length of time the corn spends drying in the field makes a difference in how fast the grits cook. The coarseness of the grind will also determine the cooking time and the end texture. The finer the texture, the faster the grits will cook.
Of course it’s best if the corn is used right after it’s milled. If you don’t have that luxury, keep the grits in a Ziploc bag in the freezer, where they will keep for a month or so.
- Each variety of corn has a different aroma and a different flavor. I like to eat grits that come from around the South and compare tastes. Try different ones until you discover your favorite.
Here is my preferred method for cooking grits (for the most part). The precise timing and the amount of water depend on the factors mentioned above.
1. Put 2 cups grits (see below, but Anson Mills Antebellum Coarse Grits are always a good choice) in a bowl and cover with 8 cups spring water. Don’t use tap water; the flavor and calcium content of tap water vary depending on the source, and that will affect the flavor of your grits -- trust me. Allow the grits to soak for at least 6 hours, preferably overnight.
2. Use a skimmer to remove the hulls and chaff from the top of the water. Be careful not to disturb the water too much, or they will fall back down into the grits and you’ll have to wait again until they rise back to the top of the water.
3. Pour the grits and soaking water into a pot with twice the capacity of the volume of grits and water; this is important, because as the grits hydrate, they expand. Turn the heat to high. With a silicone spatula, stir like crazy to keep the grits moving until the water comes to a boil. When it comes to the boil, you will see the starch take hold (you’ll know it when you see it): the water goes from clear to creamy.
4. At this point, I take the grits off the stove and let them relax for a bit. Put a lid on the grits to hold in the steam (I think it helps trap a lot of the flavor in too).
5. After about 10 minutes, take the lid off the grits, put them over low heat, and add a couple of fresh bay leaves. Cook the grits for about an hour, stirring frequently. Taste the grits, every 15 minutes or so. After an hour, you’ll feel a textural change, and the grits will be very soft and tender. They will tell you when they are done -- it’s not something you set a timer for.
6. Remove the bay leaves and add salt, hot sauce, lemon juice, and butter to taste. I like to eat grits all by themselves -- yup, just grits in a bowl. And I think about the history and future of the South with every bite.
Related
Before You Go
