Read more Thanksgiving recipes, techniques, tips, and ideas from Meathead's kitchen and grill deck at AmazingRibs.com
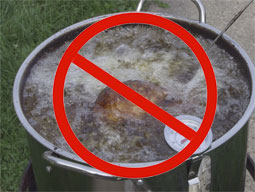 This is no ordinary turkey preparation, pilgrims. Follow these detailed steps and you will never have a dry, stringy, cardboardy, boring bird again. Nor will you ever risk life and limb deep frying a turkey again. This will be the best turkey you've ever tasted, far better than fried. Tell us below about the best turkey you ever tasted, and then try this one. And before you start raving about frying, read this article by the estimable Kenji Lopez-Alt in The Food Lab.
There are several tricks we will employ that make this turkey soar while most barely walk. I recommend smoking it, but if you must cook indoors, there are a number of tips and techniques we employ that will amp your bird to 11:
- We will soak the bird in a flavorful brine if it is not "self-basted" or "enhanced" when we buy it. This will amplify flavor and add moisture.
- We will use aromatics in the cavity instead of a stuffing. This will add flavor to the meat and prevent it from overcooking.
- We will use a rub of oil and aromatic herbs that bastes and flavors under the skin as well as on top of it.
- We will oil the outside of the skin for crispiness.
- We will not truss or tie the bird. We will let the entire surface brown, even the armpits, because nobody wants rubbery wings. But we will prevent the wings and drumsticks from burning with foil.
- We will not cook it breast side down as has become popular. Liquid just does not move through muscle tissue that far. And where would the moisture come from? there's just a flap of skin above the breast when it is upside down. My method makes the breasts more moist. .
- We will roast the bird in a humid, aromatic, smoky atmosphere to hold in moisture and add flavor.
- We will not place the bird in a roasting pan. We want convection air to flow all around it.
- We will use a digital probe to monitor the bird's temp to make sure it is not overcooked, not the plastic popup that is set too high and is unreliable.
- We will remove it from the heat at 160°F instead of 170°F as most recipes recommend, and it still will be safe.
- We will slice the breast across the grain so it is more tender.
- We will crown it with an amazing thin gravy that soaks into the meat rather than sitting on top of it.
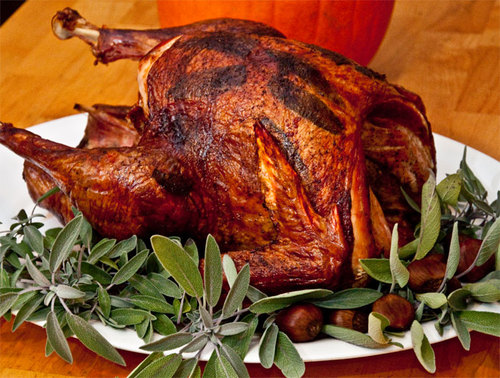
- The result will be a magnificent looking, dark mahogany avian, with incredibly tender and juicy meat delicately and elegantly flavored with savory herbs and seductive smoke.
You don't need a fancy smoker to make a killer smoked turkey!
Some other recipes for a great turkey and tuber dinner
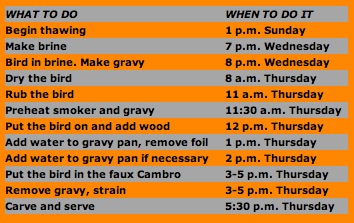
Don't sweat the timing with a faux cambro
At 325°F, 15-pound bird will be done in about 3 to 3.5 hours and a 20-pound bird should take a total of about 4 to 4.5 hours, depending on how well you control the oven temp and how often you open the lid.
If you are unsure about what temp your cooker will settle in at, and variables like the ambient temperature, sun, and wind can really muck things up, I recommend you put the bird on early, and when the probe says it is 160°F, put the bird into a faux Cambro (a plastic beer cooler) to keep the bird warm until dinner time. While in the faux cambro, the meat temp will rise at first to about 165°F, and then it will slowly cool. But it will take several hours to get dangerously cool, below 150°F, if it is a good tight box. The faux cambro is especially handy if you need to take the bird over the river and through the woods to grandmother's house. If you have space in the oven, you can cover the bird with foil to keep in moisture and put the bird in the oven at 155°F until you are ready to serve. But you probably won't have room in the oven because Aunt Annie is bringing her famous sweet potatoes with marshmallows and then there's the string bean casserole and the stuffing, etc. So get that cooler cleaned up.
Practice makes perfect
Stuffing on the side
1) An unstuffed cavity allows smoke and flavor into the meat from the inside.
2) Stuffing pulls flavor and juices out of the meat.
3) Cooking a large cold mass of stuffing so the juices are safe to eat means that the meat will be overcooked. If you must have stuffing, and if you're having me over, you better have stuffing, then cook it on the side. And why not cook it in muffin pans so each individual serving will brown all around making lots of crunchy bits for everyone. If you want your stuffing wet and juicy, there will be lots of gravy from this recipe to pour over it.
4) Stuffing sticks to the ribs and if you break down the carcass and make stock the next day (see below), the bread in the stuffing will make the stock cloudier than usual.
Want a good recipe? Try David Rosengarten's Classic Bread, Butter, and Sage Stuffing.
Turkey t*ts
Secrets of crispy skin
2) Oil the skin with vegetable oil or clarified butter just before cooking. Regular butter has water in it and that can soften the skin.
3) Cook at 300°F or more.
4) Keep the door closed and the heat in. That means no basting. Basting liquids do not penetrate the skin! Basting is not necessary for good color. The heat and smoke will take care of that. If you must baste, use oil, but nothing water based, which just gets the skin soggy, cools the meat, and slows the cooking. Best plan: Just lay off the basting. Do you hear me, all you masterbasters?
6) For crispy skin you must get the timing right. The bird must come off the cooker, rest for no more than 15-30 minutes, and then be carved. Using the faux cambro method makes the skin soft.
Read this article for more on the subject of basting.
Is pink meat safe?
In addition, smoked meat turns pink due to a chemical reaction with the combustion gases and the smoke and the meat.
Click here for more on what are ideal meat temps. Click here for more on meat science and the thermodynamics of cooking.
What you need to know about turkeys
Now beware, it is getting hard to find a bird that has not been injected. There are a lot of turkey farmers who will sell you a fresh bird, just look for them and order early. Some butchers have a relationship with local farmers and they'll take orders for fresh birds. You can usually order an unpumped bird from Whole Foods.
Buy a fresh turkey only if you are certain it has been killed recently. I would rather have a frozen bird than a "fresh" bird that has been sitting around for a couple of weeks. There is not much of a flavor difference between fresh and frozen birds.
Whatever you do, don't brine an enhanced bird with an altered brine with less salt. The salt concentration is needed to prevent microbial growth, and a less salty brine could suck moisture out of the meat.
Some people believe hens are slightly more tender than toms, but because most turkeys are slaughtered when young, usually 4 to 5 months old, there is no noticeable difference according to Cook's Illustrated magazine.
Remember, raw turkey is potentially dangerous. It is likely to be full of microbes. This is unavoidable in most grocery fowl. So you must thoroughly wash your hands, tools, counter top, sink, platters, and anything that contacts the uncooked bird. Click here to read more about food safety.
How big a bird?
If you have a large crowd, it is better to cook two 12 pounders than one 24 pounder if you have the room. Here's why: The breast on a turkey is the thickest piece of meat and the last to finish cooking. The bigger the bird, the thicker the meat, the longer it takes to cook the center of the breast to proper doneness. By the time it is done, other parts are overcooked, and the outer parts of the breast are dry. Cooking two birds will not take longer than cooking one if you get the cooker up to the proper temp.
Special tools
2) Plastic drink cooler. You will need a well-insulated plastic drink cooler large enough to hold the bird and cover it with brine. Do not use a styrofoam cooler. It could give the bird an off flavor and you'll never get it clean when you're done. This cooler can also be used when the bird is cooked to keep it warm until you are ready to carve. I call it a faux Cambro, click the link for more info on the concept.
3) Roasting pan and rack. You'll need a roasting pan for the gravy and rack to hold the bird above the pan. The pan should have at least 3-quart capacity and be large enough to fit under the bird in the cooker as in this picture. The rack should cover the pan and hold the bird a few inches above above the liquid. If you are using a bullet-shaped water smoker like a Weber Smokey Mountain (click the link for setup info), you can use the smoker's water pan for the gravy.
4) Thermometer with a probe. A digital thermometer with a probe that can be inserted into the bird and a cord that can run from the probe to the outside of the smoker so you can monitor the temperature while the bird is cooking. Click here for a buying guide to thermometers. Do not trust the popup thermometer that comes with the bird. It is set to pop at too high a temperature and will guarantee an overcooked bird.
5) Smoking wood. You'll need about half a cup of smoke wood. That's all you need. Turkey loves smoke, but too much can ruin it in a hurry. I usually use chunks of apple wood, but if you do not have chunks, you can use chips. If you cannot find apple, try alder, peach, or oak. Try to avoid mesquite, and hickory. They'll work, but I think they're a bit too strong for delicate lean meats. Click here for more on smoking woods.
6) Lifters. You'll need turkey lifters or bear paws. If you don't want another gadget in the kitchen, you can lift a turkey by sticking the handles of two wooden spoons into the cavity.
Ingredients
1 turkey, 15 to 20 pounds. Read my article on thawing meat
1 large onion, cut in quarters
1/2 cup smoking wood
2 large sprigs of fresh sage or thyme, each about 3-4" long (optional)
For the gravy
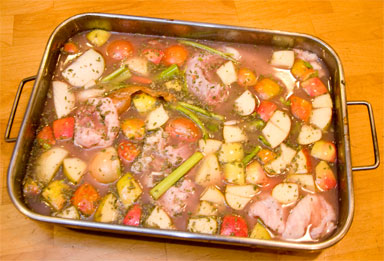
The gravy goes in the pan under the bird while it cooks. It puts aromatic humidity into the atmosphere, helping to keep the bird moist, and captures drippings, making an incredibly flavorful broth. Don't skip this.
3 quarts water
1 cup apple juice
2 onions, skin on, ends removed, chopped into quarters
2 medium carrots, peeled and cut into 2 inch lengths
1 stalk of celery, cut into 2 inch lengths
1 tablespoon dried sage leaves, crumbled (do not use sage powder)
1 tablespoon dried thyme
trimmings from the bird (neck, tail, excess skin and fat)
Optional. You can replace some of the water with chicken stock, vegetable stock, or a bottle of a white wine. I usually get a white wine from the closeout bin of the local liquor store. Oxidized white wine is fine, just don't get anything that has turned to vinegar. And no red wine! I have occasionally added mushrooms to the gravy, too. You can substitute a small handful of celery leaves for the celery stalk. This is a good way to get rid of them.
For the brine
2 gallons water
3 gallons crushed ice (or 3.5 gallons of ice cubes)
7.2 cups pickling salt (or 4 cups table salt or 6 cups kosher salt)
2 cups brown sugar
6 tablespoons garlic powder (not garlic salt)
4 tablespoons crushed black pepper
2 (5 pound) bags ice in water-tight bags
For the wet rub
1 teaspoon dried crushed sage
1 teaspoon dried crushed thyme
1/4 cup of vegetable oil or olive oil
Preparing the gravy
1) After the bird has thawed, open the bag it came in and pour the juices into a large non-reactive pot. Put the neck in the pot too.
2) Remove the gizzard, heart, and liver. They will not be used for the gravy. Cook and feed the gizzard and heart to the dog. Freeze the liver and save it along with your chicken and duck livers until you have enough to make a nice paté. Be sure to check for innards in both the big rear cavity and in the smaller front cavity under the skin flap.
3) Remove the tail and trim excess skin and fat from around both cavities, front and rear, and put it in the pot along with the neck and the juices.
4) If there is a plastic pop-up thermometer, remove and discard it. If you rely on it you will be eating cardboard.
5) Add the rest of the gravy ingredients to the pot and bring it to a simmer for about 15 minutes. Cool and refrigerate. We will use it in the drip pan during cooking.

Preparing the brine
If your turkey says it has been "enhanced" or "basted" or is "self-basting", that usually means it has a salty solution injected into it. Never brine a bird that has been injected. I know from first hand experience, and my wife won't let me forget it. Click here to learn more about brines and how they work. If your bird has been enhanced just skip the brining stage.
You will brine the meat in a plastic insulated cooler. If the cooler is large, you may need to scale up the brine recipe to make sure the bird is submerged. You can use something like a large stainless steel pot, but the ice will melt quickly if it doesn't fit in the fridge and you'll need to change it regularly. Do not use an aluminum pot. I can react with the salt and create off flavors. If you only have an aluminum pot, line it with a food safe plastic bag such as the Ziploc XL. But the best tool by far is an insulated plastic cooler. You can use it later when the bird is done. Just clean it thoroughly with hot soapy water first.
You may see brine recipes elsewhere that call for adding chicken stock, vegetable stock, apple juice, and all kinds of herbs and spices. Don't waste your money. They barely impact the flavor. You'll have plenty of flavor without them, especially from the gravy.
1) Mix all the dry ingredients in 1 gallon of warm water and stir until salt and sugar dissolve. I recommend pickling salt because it has no additives and because it dissolves easily, but plain table salt is fine. You can boil the water if necessary to help dissolve the salt and sugar. Pour the brine into the cooler and add 1 gallon of cold water and 3 gallons of crushed ice or 3.5 gallons of ice cubes (cubes take up more volume than water).
2) Put the bird into the brine breast side (the large humped side) down. Clean the plastic bags of ice thoroughly with soap and water and rinse them completely. People often walk on them in the delivery truck. Put the bags of ice inside another plastic bag if necessary to make sure they don't leak and dilute the brine. Put one bag of ice in with the bird now and store the other in the freezer. You will use it in about 6 hours when the first bag is mostly melted. Move the bird around and get the air bubble out of the cavity. Most of the brine will enter the meat through the cavity, since the skin is like a water-resistant jacket. Let the bird swim in the brine for up to 12 hours in a refrigerator or other cool place. Keep the brine under 40°F, adding more ice when necessary. If you can see unmelted ice, it is probably below 40°F.
3) After no more than 12 hours, remove the bird, rinse it thoroughly inside and out so the exterior will not be too salty, and pat dry. Do not leave it in the brine too long. Rinsing is crucial!
4) While the skin is soft and elastic, insert your fingers carefully between the skin and the meat and loosen it so later you can put the baste there. You can work from both the front and rear, and reach down to the thighs and wings.
5) Place the bird on a rack in the refrigerator for 3 hours or more so the skin will dry. You can even leave it there overnight. This will help make the skin crispy.
Preparing the rub
Optional. Sometimes, if the sage in the garden hasn't frozen, I'll put a little olive oil or butter and whole fresh sage leaves under the skin instead of a wet rub and use the wet rub on the outside of the skin only. If you look at the picture of the finished bird up close you can see the sage leaves under the skin. They taste great.
1) After the bird has emerged from the brine and after the skin has had a chance to dry a bit, mix the herbs with the oil and gently push it under the skin and on top of the breast. Spread it out and work it as far down to the thighs as possible.
2) Spread the remaining rub on top of the skin. The oil will help it brown and make it crispy. If you run out, rub the exterior with olive oil or vegetable oil and sprinkle with pepper, sage, and thyme. Skip the salt. The brine has salted the meat perfectly.
Cooking the bird
2) Clean the grate you will cook the bird on before you put the drip pan in. Pour the gravy into the drip pan, put it onto the cooker so the liquid will preheat and take a load off the cooker when you put the bird on later.
3) If you have a digital thermometer with a probe on a wire, insert the probe into the front of the breast so the tip is in the center of the thickest part of the breast, being careful not to touch the ribs or keel bone. That's usually right where the popup thermometer was.
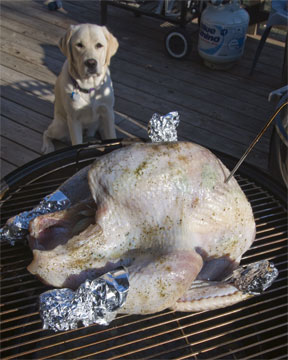 4) Put the onion you cut into quarters and stuff it into the cavity. If you wish, put some fresh herbs in there too. I like sage and thyme. Take four pieces of aluminum foil, each about 8" square, and coat one side with vegetable oil so it won't stick. Cover the wings and drumstick tips with the foil. That will keep them from burning. You'll take the foil off after an hour, so the skin will brown and crisp. Do not pin or tie the wings up against the body of the bird or fold the wing tips underneath as some cookbooks say or the skin will not brown and crisp there, and what's the point of wings if they're not crisp?
5) If you're using a gas grill wrap the wood in aluminum foil, poke holes in the packet so the smoke can escape, and put the wood beneath the grates as close to the fire as possible. On a charcoal cooker, the wood goes right on the coals, no foil needed. Put the rack on top of the drip pan and the bird on the rack, breast side up. Some people like to cook breast side down because they think fat and juices will percolate down and keep the breast moist, but juices can't travel through that much flesh, and besides, it's not necessary for this bird. It's been brined. It will be plenty moist. Do not put the bird into a roasting pan. We want her sitting out so she can get smoke and moisture penetration. Close the lid and don't open it for an hour. Every time you open the cooker you let out heat and moisture and you delay dinner. That means no basting. Not if you want crispy skin.
6) After an hour, open the cooker and remove the aluminum foil. Do not baste. If you don't have a thermometer on a wire already in the breast, check the temperature with a good probe thermometer by inserting the probe into the deepest part of the breast, near where the popup was. Push the tip past the center and slowly pull it out. The lowest temp is the one to watch. If necessary, add a quart of boiling water to the gravy pan. Make sure there are at least 3 inches in the pan at all times. Do not let the onions and other solids in the pan burn! While you're under the hood, if you are using charcoal add another 15 to 20 chunks every hour. Tilt the bird and drain any liquid from the cavity into the gravy pan. Repeat this step every hour. Do not add more wood. The worst thing you can do is oveersmoke. Go easy.
If you fear that the bird is moving too slowly and you are having trouble keeping the temp up to 325°F, preheat your indoor oven to 325 to 350°F and move the bird and the gravy inside. It will be fine this way. Most of the smoke flavor is already in the bird.
7) When the internal temp of the breast passes 160°F, drain the cavity into the gravy. Many cookbooks say you should take it up to 170°F or 180°F, but that temp is guaranteed to produce meat as dry as cardboard. If the temp is 160°F in the center of the breast with an accurate digital thermometer when you take it off, it will rise another 5°F if you let it rest about 15 minutes. At 165°F in the breast it is safe according to the United States Department of Agriculture (USDA). At that temp, the thighs are likely to be at 170°F or higher. They can handle it because they are juicier and slightly more fatty. Don't worry if it is slightly pink. Smoke can turn meat pink and, according to USDA, slight pink is OK (see the sidebar above).
Use turkey lifters or bear paws or clean oven mitts or two wooden spoons with the handles stuck into the cavity to move the bird to a large pan or platter with sides that will contain the copious juices when you cut it. A cutting board will overflow! Let the bird rest at least 15 minutes before you start carving. Resting allows the pressure built up inside the meat to ease up a bit and the juices will not come gushing out. If you have to travel over the river and through the woods, wrap the bird in foil and clean towels and put it in a very clean beer cooler, perhaps the one you used to hold it when brining. I call this a faux Cambro. The temp will rise about 5°F at first, and an hour later the temp will drop only 5 to 10°F! Just don't let it drop below 145°F.
8) While the meat is resting, carefully remove the gravy pan from the cooker. Pour the gravy through a strainer into a large saucepan. Taste it. It should be rich and flavorful. If you find it too weak (unlikely) bring it to a boil and cook it down a bit. Do not thicken with flour or cornstarch. Starches will prevent it from penetrating the meat. I have been known to pour it into a coffee thermos to keep it warm. When you are ready to serve the bird, transfer some to a gravy boat or serving bowl. Leftover gravy can be frozen. It is killer as a soup base or for cooking rice, risotto, or couscous.
9) If you absolutely must have the thick kind of gravy you had as a kid, take about 4 tablespoons of the fat you skimmed off and put it in a saucepan over medium heat with 4 tablespoons of flour. Whisk the flour until it is smooth, and keep whisking until the flour starts to brown, about 3 minutes. This is called a roux, and the browning cooks the flour and kills the pasty flavor. Slowly pour in 2 cups of the gravy, whisking as you pour, and keep whisking until it thickens. It shouldn't need any seasoning, but you can add salt if necessary.
Carving
2) You will need two platters, one for the white meat and one for the dark meat. Why is there a difference in color and flavor? According to the USDA "The pink, red or white coloration of meat is due primarily to oxygen-storing myoglobin which is located in the muscle cells and retains the oxygen brought by the blood until the cells need it. To some extent, oxygen use can be related to the bird's general level of activity: muscles that are exercised frequently and strenuously -- such as the legs -- need more oxygen, and they have a greater storage capacity than muscles needing little oxygen. Turkeys do a lot of standing around, but little if any flying, so their wing and breast muscles are white; their legs, dark. The major reason that poultry meat is much lighter in color than beef is that it is dramatically lower in myoglobin. Also, as an animal becomes older, its myoglobin content usually increases. Turkeys today are young, 4-5 months old at the time of slaughter."
First the dark meat. Take a paper towel and grab the top of a drumstick and bend it until the joint between it and the thigh is visible. Sever the joint and remove the leg. Then hold the thigh with the paper towel and cut through the skin that connects it to the body. Bend the thigh back to find the hip joint. Cut through the joint removing the thigh. Repeat with the other leg and thigh. You can serve the thigh whole, or you can remove the meat from the bone and slice it if there are a lot of people who want dark meat. To do this, flip the thigh skin side down, and run your knife around the bone and under the bone until you can lift it out. Then turn the thigh skin side up and cut it into slices.
3) Now remove the wings by grabbing each wing with a paper towel, bend it back to locate the shoulder joint and cut through it. Arrange the wings, thighs, and drums on one platter and pour a little gravy over them.
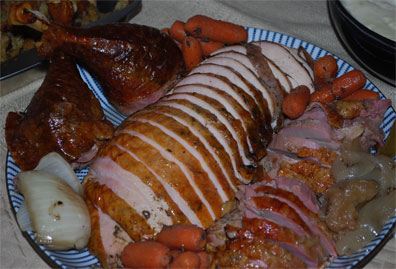 4) Now for the white meat. The plan is to remove each breast from the carcass and then cut them into beautiful slices across the grain so it is more tender. In the middle of the bird is the keel bone. It separates the two breasts. Cut down along the keel bone until the knife hits the rib cage. Then tilt the knife and work along the rib cage until the breast falls away. Lay it skin side up on a cutting board and slice it across the grain in 1/8 to 1/4" slices. Fan the meat out prettily on the platter. At right is a platter cooked by this recipe and and carved by reader Jeff Giberstein of Atlanta, GA. He says "It was my world's record best turkey ever."
5) Carve away as much of the remaining meat from the carcass as possible and put it on the appropriate platter. Now pour a little gravy over the top of the meat, enough to moisten it but not drown it. Put the carcass in the fridge. Don't leave it sitting at room temp for more than 30 minutes.
Now it's your turn. Tell us about the most wonderful turkey you ever tasted.
All text and photos are Copyright (c) 2010 By Meathead, and all rights are reserved