Here's a simple thing you can do to improve your turkey. Throw out your roasting rack. It's time to kill this old tradition whether you are cooking indoors or outdoors, whether you are roasting a turkey or prime rib.

The traditional roasting configuration is a U- or V-shaped wire rack that sits in a deep roasting pan with water in the pan to keep drips from burning. It is a recipe for undercooked dark meat, flabby skin as pale as an Alaskan sunbather on the bottom, and possibly a health hazard.
The problem is that the sides of the pan block warm air from reaching the underside of the bird (the back), and the liquid in the pan keeps the air in the pan a lot cooler than the air above the pan. If you remove the bird when the white meat hits 155 to 165°F, the back and thighs will be undercooked. If you are smoking the bird, the smoke will not get down into the pan. You can flip the bird breast down, but then the roasting rack scars the presentation side with indentations.
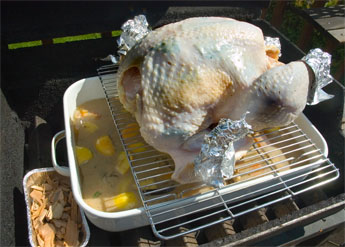
The best way to cook a turkey is to put it right on the wire rack directly above a large drip pan. That way the warm air will circulate evenly about the bird as if it were flying, and the liquid below wouldn't cool the meat. Then the skin will be taught and crisp, and the dark meat cooked properly.
To test the theory, the AmazingRibs.com science advisor, Prof. Greg Blonder of Boston University, measured the temps at different levels above the liquid in a 3" tall roasting pan.
Even though the oven air was 325°F, the liquid never reached boiling temp in the two hours or less that it took to cook the turkey to safe temp in the breasts. Evaporation of water from the surface cools the liquid in the same way sweat cools us on a hot day, so the temp of the drippings never got above 175°F, a full 150°F cooler than the oven air temp.
As you can see from the illustration, if the bird is below the lip of the pan and just above the water, the back of the bird is in 240°F high humidity air, 85°F cooler than the top of the bird which is chugging away at 325°F, browning nicely in dry heat. By the way, I am not a fan of the high temp cooking methods. They tend to dry out the exterior by the time the center of the meat hits the proper temperature.
Even if you place the bird on a grate on top of the pan, the bottom will still be much cooler than the top and will almost certainly be undercooked.
In order to heat the bottom of the bird properly, you need to get the meat about 3" above the pan for the air temp to be 325°F all around. If you can't get your bird above the pan, you should place it on the lip of the pan and start it breast side down and turn it over after an hour.
If you are cooking on an outdoor grill, the tricky part is arranging everything. The ideal setup is to place the pan above the flame and put the bird on a rack 2 to 3" above the pan. You may have remove the drip pan about 20 minutes before the bird is finished and put it above direct heat to crisp the skin and cook the meat. Just be sure to watch it carefully so it doesn't burn and check the temp in the breast before bringing it in.
Make better gravy
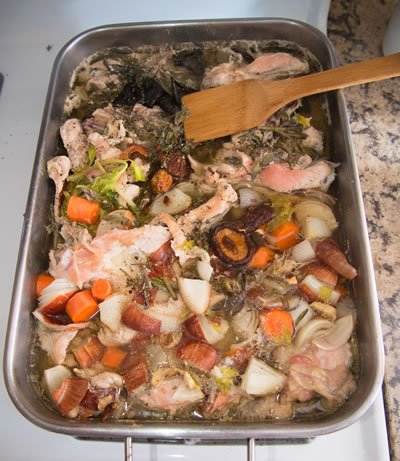
Just before removing the bird, remove the stock, put a new pan underneath the bird to catch any more drips. Strain the stock, skim the fat, taste, concentrate it if you wish by boiling it down, and adjust the salt only at the end. I serve it just like this, thin enough to penetrate the meat, but if you want traditional flour based gravy, take 4 tablespoons of flour, 4 tablespoons of the melted turkey fat and/or butter and put them in a saucepan over medium heat. Flour tastes better than cornstarch if you do this properly. Whisk the flour until the mixture is smooth, and keep whisking until it starts to turn pale amber, about 3 minutes. This is called a medium roux. The browning cooks the flour and kills the pasty flavor. You can make it richer by cooking it longer and letting it get darker, but don't let it turn brown.
Slowly pour 1 cup of the pan drippings into the roux, whisking it over medium heat as you pour, and keep whisking until it thickens and all lumps are gone.
Taste it before you add anything. You will probably want to add another cup of drippings. You should not need to add salt and pepper. This should make the traditionalists very happy because this, enriched stock will make a better gravy than any they ever had, especially if you grilled the bird and the drippings are smoky.
For more of my tips on turkey, including how to shop for turkeys, when to start defrosting, why you should dry brine not wet brine, how to butterball your bird, why you shouldn't stuff the bird and how to make stuffing muffins, why you two smaller birds are better than one big one, why 325F is the best roasting temp, how to carve, what to do with leftovers, what wine to serve, and recipes for side dishes including drunken cranberries, click here.
 All text and photos are Copyright (c) 2015 by Meathead, and all rights are reserved. Meathead has served as a lecturer at Cornell University's School of Hotel Administration, adjunct professor at Le Cordon Bleu Chicago, wine critic for the Chicago Tribune and the Washington Post, and director of AOL Food & Drink Network. For more of his cooking, barbecue, and grilling science, tips, and techniques, visit AmazingRibs.com , the world's most popular outdoor cooking website. Subscribe to his email newsletter, Smoke Signals. You can order his book "Meathead, The Science Of BBQ & Grilling" on Amazon. Follow Meathead on Facebook.