Some of you may remember my post from Hannukah last year, in which I shed all my Jewish inhibitions about decorating for the season, and decided to go all out celebrating "the festival of light."
My (modern) orthodox rabbi, after all, signed off on it; and no less an authority than the Talmud urges Jews to publicly celebrate the holiday. So why sit in the dark while the goys have all the fun?
This year I've gone further: I've strung white lights and greenery around my door, and festooned interior mantles with cedar rope, candles, and other suitable decorations. By suitable, I mean that I stick to a blue, silver, and white color scheme -- with splashes of gelt-ish gold. Last year I used yew, but came to think that "yewy was not Jewy." What could be more Jewish than cedar? Similarly, juniper, eucalyptus, lemons, oranges, and grapes are all found in Israel. My Rabbi suggested I throw in some decorative figs and pomegranates as well. And this year's "wreath" -- in the shape of a Star of David -- even features a Kosher Dill.
Of course, you can't (yet!) buy the distinctive six-pointed star wreath at your local plant store or CVS. But they are not hard to make, even for someone as "uncrafty" as me. For Jewish readers who would like to celebrate the start of the festival this Friday with something more than latkes, I offer you this step-by-step "how-to" guide to making a wreath. Of course, there's no reason why you couldn't shape it as a dreidel.
Step One: Making the form

I found these green stakes at the plant store. Bamboo poles also work, cut to size. Form two triangles, tethering the ends together with green florist wire. Then lay the triangles on top of each other to form the star. Secure with more wire.
Step Two: Adding greenery

Next use wire to secure greenery branches to the frame, following the star shape. I bought my greenery in bulk from my plant store. While the cedar will stay fresh if kept outside for a couple of weeks, bear in mind other greens might not hold up so well and dry out. The eucalyptus was not going to last, so I spraypainted it a silvery white (I bought craft spraypaints at the hardware store). You could also use spray lacquer if you wanted to keep it green.
Step Three: Adding lights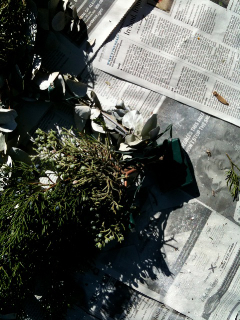
(Note the dark green battery box on the right, just by the tip of the star)
After you've layered on and tied the base greenery, you'll need to string on lights (if you're using them). My plant store sells short, battery-operated strings of white lights. The package says they are for indoor use, but if your door is sheltered, they'll be okay outside. Start at what will be the top of your star, so the battery box can eventually be hidden by the bow with which you'll hang the finished wreath. Then wind from there. You may not have enough lights to outline the entire shape (I didn't), so I just wired the center. It works.
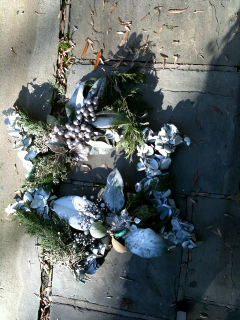
Step Four: Adding more greenery and decorations
Now the fun begins. On a few of the star's lines, I layered on clusters of a different type of cedar, with blue berries, and juniper, which gave the wreath more fullness and texture, as well as some magnolia leaves (whose ugly brown undersides I spraypainted silver). Then I squirted some of that spray-on snow in places; and dusted the whole thing with a light, sparkly laquer. I tied on silver decorations: grapes, dangling beaded threads; and in one of the magnolia clusters, I nestled a lemon, a lime, little grapes and my pickle. Next year I may hunt down a bagel ornament. And of course, there are always dreidels!

Above, I've added the magnolia leaves and some additional cedar and juniper.
The almost-finished wreath.
Last Step: Tying on a Bow, and Hanging
Buy a roll of the most beautiful, wide, wired silky blue (or silver, or gold, or whatever color you prefer) ribbon, and tie a big bow at the top of the star. When you cut the ends of the ribbon, leave enough so it has two nice tails hanging from it. You can tie on more ribbon if you like (mine is silver, with an additional gauzy dark blue tied on the center of the bow). Shape the bow and make it look extravagant. It should be large enough to hide the dangling battery switch for the lights.
Meanwhile, tie a loop of wire behind the bow, at the top of the star as well, and ensure it's secure enough to hang the wreath from a hook or nail on your door. Happy Hannukah! (And readers, if you make one, please make sure you share photos in the comment section!)
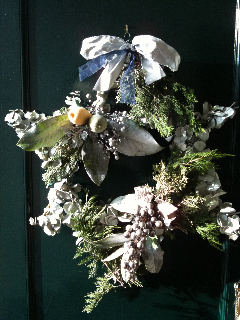
Voila! The finished wreath! Start to finish: About an hour.