For some parents, it's not "back-to-school" time. For some parents, it's just "go-to-school" time. These moms and dads have kids starting school for the first time EVER. And if you are one of those parents, I'd like to congratulate you. I'd also like to warn you about something. Your kids are going to come home with a crazy amount of art. And the word "art" will be a stretch in some cases.
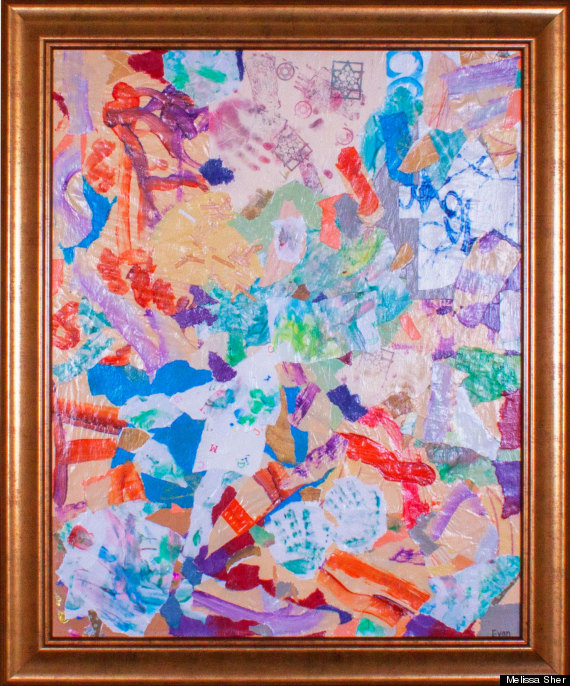
You see, before I became a parent, I had no idea how much art my kids would generate. (I also didn't know how many times a day I would start using the word "poop.") When my oldest son was 3, I realized that I had a predicament. We were starting to amass an enormous collection of his work, and our refrigerator was only so big... as was our house. Eventually, I devised a plan. I gathered up 20 or so of my son's pieces, bought a canvas and made a collage.
Before I go any further, you need to know something about me. I can't draw, I can't paint. In fact, if you are crafty and good with your hands, this story isn't for you. Don't waste your time reading this. Do something constructive. Go needlepoint. Go weld. Go make some sushi out of fruit.
No, this is a craft story for people like me because it involves only two things: ripping and pasting. And, the beautiful thing is that in the end -- no matter how much you think you might have screwed it up -- it's going to look good.
SUPPLIES:
Your kid's art: This is your chance to gather up some of the many, many, many abstract drawings, scribbles and paintings that your son or daughter makes. Any kind of paper will work. My only suggestion is not to use "representational" drawings, such as your child's self-portrait. You don't want to upset your little Rembrandt. Therapy is expensive.
A handful of foam brushes: They're cheap. You can never be too rich or have too many foam brushes. And, actually, if you've ever watched My Super Sweet 16 on MTV, you can be too rich.
Pre-stretched canvas: Buy one at any art supply or craft store. Unlike a pair of Chanel pants, they come in every size.
Non-toxic decoupage glue: Various brands (Mod Podge, Aleene's, Martha Stewart) are available in craft stores. I've read that Elmer's Glue-All can be diluted with water (3:1 ratio) and will work just as well, but I haven't tried it myself. Fun fact: the glue dries clear. Another fun fact: Jon Hamm once played a cable guy on The Sarah Silverman Program.
Slightly damp rag or sponge: Use this to wipe away excess glue.
Cup or dish to hold the glue: The glue will wash out with soap and water. (I must be hungry because I initially typed "soup" instead of "soap." As far as I know, the glue will not come out with soup and water.)
Old newspapers or garbage bags: I like to cut up garbage bags and place them under me to protect my workspace when the glue drips. Newspapers work too. As do photos of yourself when you were 14 and going through an awkward stage. If you don't have any, contact me. I'll lend you some.
(Optional) A couple sheets of brightly colored paper. In my example, I added a few pops of color to the collage with turquoise and hot pink paper. This step is not for the purist.
DIRECTIONS:
1. If your kid is old enough to understand that you are about to tear up some of his or her art, you need to get his or her permission. Even better yet, let him or her help you. Remember what I told you about therapy.
2. Using a foam brush, cover your canvas in a coat of decoupage glue. It will dry within minutes.
3. Tear up the art you've gathered.
4. Take a piece of the torn paper, apply a layer of glue to it with the foam brush.
5. Pick a spot on the canvas. Lay the paper with the glue on top of it. Put your fingers on top of the piece of torn paper and apply pressure; then, push outward from the middle to just beyond the edges of the paper. Glue will ooze out of the sides but -- fear not, you faceless stranger -- you can wipe it away. And, even if you don't, it dries clear.
6. Continue. Overlap pieces. Go nuts.
7. Keep going.
8. Don't stop. You are almost done.
9. Actually, I take that back. You still have quite a way to go.
10. When you are finished, brush on 2-3 coats of decoupage glue on top of the finished collage. This is your sealant.
11. Hang your masterpiece.
12. Practice for the compliments you are going to get from your family and friends by sitting in front of a mirror for at least two hours, tilting your head ever so slightly and batting your eyelashes. This may take longer than the actual art project but it's nice to make time for yourself.
This post originally appeared on the blog Mammalingo, which was named best blog of the year by my mom.