Co-authored by Kristen Lee Barrett, co-owner of Darling Creative Company
Okay brides and grooms: the holiday season is upon us and whether you have a ring on it yet (or not), it will soon be time for YOU to pop the question to your bridesmaids. I see this as the perfect opportunity to curl up by the fire with a cup of hot cocoa, take out that glue gun, and get to work. You only get to pop the question once, so it's a fun opportunity to make something memorable and show your girls how much they mean to you. We've come up with three DIY gift ideas (and instructions) for the big ask.
1) Your style is crafty and vintage.
Pamper your besties with a homemade body scrub and coordinate the scent with your wedding season -- something like pumpkin for fall, lavender for spring, cinnamon for winter, and floral for summer.

Photo credit: Sweet Lady Jane Photography
2) Your style is glam and flashy.
What better way to celebrate the giving season than showing your gratitude for your best girls by making them a keepsake -- in gold, of course! Celebrities from Blake Lively to Jessica Alba have been sporting the personalized bar necklaces -- so I wanted to put my own spin on the trend. I found circle pendants that were easy to engrave, so now your girls can be reminded of you every time they wear it!
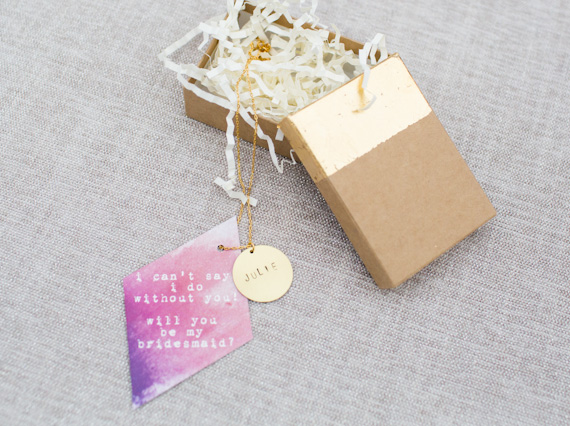
Photo credit: Sweet Lady Jane Photography
3) Your style is clean and polished.
While you're at home for the holidays, spend time "hanging" with your bridesmaids and give their bridesmaids dresses a little special treatment with a personalized hanger, adorned with a velvet bow. I printed a special message on a standard door hanger tag, and then added some glitter to give it a little something extra. Your girls will be able to keep this fabulous piece in their closet for a long time after your wedding.

Photo credit: Sweet Lady Jane Photography
How-To Instructions:
Pumpkin Spice Sugar Scrub
Supply List:
Sealable glass jar
2 cups brown sugar
1/2 cup white sugar
1 teaspoon cinnamon
1 teaspoon pumpkin pie spice
1/2 teaspoon nutmeg
1/3 cup almond oil
Instructions:
1. In a medium bowl mix together the dry ingredients with a wooden spoon
2. Slowly pour in the Almond Oil and stir until well blended. If scrub is too dry, feel free to add more, but you don't want the mixture to be runny, just wet
4. Add scrub to jar and cover
Personalized Hammer Necklace
Supply List:
Jeweler's Bench Block
Letter + number punch stamps
Hammer
Needle nose pliers
Painters tape
Black permanent marker
Rubbing alcohol
Circle stamping blanks
Jump rings
Necklace clasp
Gold necklace chain
Instructions:
1. Use the painters tape to secure your stamping blank to the metal block
2. Choose the metal punch stamps that will make up your name/phrase/initials
3. Starting with your middle character, hold your stamp where you want it on your blank and use your hammer to do one light tap on the punch stamp, followed by a second harder one. Continue same process with remaining letters on each side to ensure your design is centered
4. To darken letters use black marker and color over each letter
5. Put some rubbing alcohol on a cloth and wipe over letters
6. Add a jump ring to top of your new charm
7. Measure how much length you want for chain and cut off remainder
8. Add your newly stamped charm
9. With needle nose pliers pull apart jump rings and add to each end of chain
10. Finally, add clasp to one end for necklace closure
Bridesmaid Dress Hanger
Supply List:
Wooden Hanger
Matte Mod Podge glue
Patterned Paper like wrapping paper or wall paper
Paint Brush
Exacto Knife
Velvet Ribbon
Instructions:
1. Apply a thin coat of Mod Podge with your paint brush or sponge brush
2. Apply paper to surface with Mod Podge on it and smooth our air bubbles using a credit card
3. After letting it dry for about 15 minutes, flip the hanger over and using your exactly cut along the edges of the hanger and trim any access
4.Turn hanger back over, clean up edges and apply a thin coat of Mod Podge over the entire surface and let it try
5. Cut ribbon and tie a sweet bow on the neck of the hanger