
Once upon a time, people looked at photographs. The result, alas, is that there are houses around the world with closets dedicated to storing all those old photos. Worse, many of those sit unlooked at, unloved. After all, if they were taken as slides, people may have no way to look at them - even if they wanted to take out their slide projector and set up their screen. The projector may be long gone, broken.
But rest easy, just as Dr. Frankenstein could re-animate his monster, so too can your old photographs be brought back to life. Better still, they can even be improved - bringing back their long-since faded color, removing dust and scratches, and even getting rid of unwanted images that got in the way, and more.
This month, we look at a few ways to scan photos and slides, and then fix them. And even look at them in a way that has a new twist.
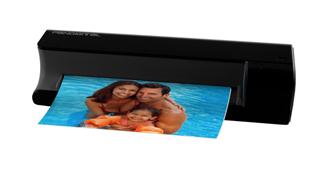
PANDIGITAL PHOTOLINK ONE-TOUCH 5X7 SCANNER (Panscn04)
The Pandigital Photolink scanner isn't terribly imposing at first glance. It's a compact unit, about 8"x3x2.5", the size of a telephone receiver. And it doesn't have many buttons to impress the gadget-crazed with. But it does its job simply and, for the most part, quite well.
It's for photographs only, no slides or negatives. That simplifies matters a bit, since photos scan easier than slides. (And much faster, generally.) By the click of a button, you can choose first whether to scan at a 600 dpi resolution or 300 dpi, to save as smaller files, though quality won't be as sharp. Then, just carefully fit your snapshots in the front slot, and they shoot out the back in around three seconds.
A nice feature of the scanner is that the scanned image can be saved either directly to your computer or if you want to be more mobile, put an SD flash card in the proper slot and your scan will be saved to it. You can then transfer the files from the card to your computer - of course you can use a card reader, but that's not necessary because you can also simply leave the Flash card in the scanner, connect the whole unit to your computer, and it will be recognized as an external drive, and you can transfer from there. It's all very convenient. And all the more since, since an SD flash card is included.
(Though a card is included, I also used a Lexar Professional 133x SDHC Flash card. The "HC" is high capacity. This particular card held 8 GB. It's exceptionally fast, reading files at a blistering 20 MB/sec. This is more than twice the speed of Lexar's next fastest Platinum line. Though this is overkill for scanning purposes, it would show its strong benefits for use in your digital camera, particularly when shooting HD video. It could be found online at the time of writing for $54, but less at smaller capacities.)
The resultant scans came out very nicely. Fairly sharp, and color recognition seemed accurate. This isn't a high-end device, so you may want to do some touch up with whatever photo software you prefer to use, but for the most part you should be reasonably pleased. My only quibble is that the scanner uses a feature called Auto Crop, which detects and then automatically crops large areas of black from your original photo. I think it would be far better to let a user determine what cropping should take place. This should rarely be an issue, but if you have a lot of night shot, it could definitely occur.
The manual recommends that you use the included plastic sheath and place your photos in it first before scanning, but particularly for older and curled photographs. I suspect that most people will bypass this, since it slows down the process tremendously.
If you do choose to scan directly to your computer, the product comes with "Scan to PC Manager" software. This makes it more convenient to organize on your computer the photos you've scanned. If your adept with using Windows Explorer (something that's pretty easy, and made easier in Windows 7), the software isn't overly necessary, but many might find it comforting to transfer your pictures automatically to whatever default location you've chosen.
The nicest feature of the software, though, is Auto Rotate. The orientation of many photos will be off because you'll have to scan many pictures sideways. Auto Rotate will correct this for you. (It can be done manually, of course.)
The Pandigital One-Touch Panscn04 retails at the time of writing for $130, though it can be found for less. The company makes a variety of models, and its Panscn05 also includes a low-end slide and negative scanner. However, it only scans photos at 300 dpi, not the 600 dpi that this reviewed model offers.
You can spend many hundreds of dollars to get a photo scanner - even into the thousands for professional-grade quality. And for the price, you often get what you pay for. But there is a lot to be said for simplicity, particularly when it does its job well. And the Panscn04 does its job quite well and extremely simply. That's a good combo, especially for basic, home use. If you want top grade, look elsewhere, and be prepared to pay more. My only complaint is the Auto Crop feature. Other than that, the Panscn04 was a pleasure.
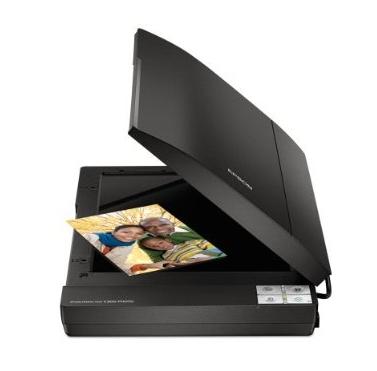
EPSON PERFECTION V300
The Epson Perfection V300 is a full-featured flatbed scanner that also provides photo scanning capability (our main focus here - no pun intended). The challenge for photo scanners is that low-end cost tends to mean mediocre quality, whereas one that does excellent work on photos can potentially be wildly expensive. Usually I mention price at the end. Here's it's worth noting it up front because that's part of the equation as to whether the Epson is worth consideration. It retails for just $99 - but at the time of writing, could be found online for $86. That would be seriously low for a good photo scanner. The question is - does the Epson V300 measure up?
The Perfection V300 comes with its proprietary software, as well as ScanSoft PaperPort 11, a very good third-party product for organizing scans and management. Oddly, though it uninstalled an earlier version on PaperPort I had on my system, it didn't install itself. I had to resinstall the product, but after that all was fine. (UPDATE: The company says that the product doesn't include PaperPort, but rather Arcsoft Mediaimpression. Since I was sent a press evaluation copy, it's possible that there was an issue with the included CD-ROM. Or -- who knows?)
To run the V300, you can either launch its software or use the buttons on the scanner. (More on the buttons later.)
If you use the Epson software, there are four modes for scanning. You can select between the modes from a drop-down box at the top:
Full Auto Mode is basic. A few settings can be changed under "Customize," but basically it's click "Scan" and let the software do the rest. Resolution options don't have as wide a range in this mode, but still go from 50 dpi to 1200dpi, which is perfectly fine for most home use. You can also make a few, basic adjustments and also determine the destination can be where you'd like the scan to be saved, as well as the file format you'd like to scan to. There's one oddity - after a Full Auto Mode scan runs, the software shuts down, and has to be re-launched for further scans. This isn't the case in other modes.
Home Mode ratchets up your options a bit more. "Destination" was a bit unclear at first glance, but easy to figure out: For instance, if you select "Printer," it doesn't send your scan to a printer, just saves the scan using settings that are proper for later printing. After selecting your Document Type, the software sets the resolution accordingly. The two defaults are Screen/Web, which scans at low resolution, and Printer with moderate resolution (300dpi). However, selecting "Other" lets you choose from a wide range of 50dpi up to 4800dpi. More adjustment options are available here, such as backlight correction and descreening. In Home Mode, you're required to preview first before scanning. Then, the File Save Setting window will pop up with the location, file format, and other options. Though more configurable than Full Auto Mode, it's still easy and fairly basic to use.
(A quick word about resolution. Scanned images are more detailed at 600 dpi than at 300, of course, but they were still extremely good at the lower resolution. Know, however, that file sizes will be much bigger. At 600 dpi, the file was four times as great as at 300 dpi.)
For most people, Full Auto and Home are the only two modes you'll likely use. But the software provides two others:
Office Mode allows you to select the Image Type, Document Source, and Size, as well as Resolution settings. A few more picture quality adjustments available. However, the resolution options are more limited than in Home mode. Additionally, you don't have to preview a first, but can directly scan. (To be clear, previewing is good thing to do, it's just that it slows the process down.)
Professional Mode gives you the most configurability. In fact, the resolution range is extremely wide - indeed, using "software interpolation" it can go as high as 12,800 dpi. You can make histogram adjustment, tone corrections, image adjustments and more. And honestly, no, I'm not 100% sure what some of these would do either - but if you are someone who requires Professional mode, they likely have meaning to you.
As mentioned, Full Auto and Home modes will be fine for most people. And of course, there's the PaperPort software to use, if that's your preference.
I have a couple of quibbles with the Epson software. I wish one could change the default resolutions for each individual Document type (like Text, Magazine or Photograph) in Home mode. You can set any DPI resolution you want by choosing the "Other" option, but you need to manually change that every time.
Also, it would be nice to be able to change the default File Save Settings for each Document type. That way, you could automatically set all photos to be saved as JPG and all text as PDF. But again, you have to manually change it for each type.
As mentioned, the V300 also lets you scan directly with buttons on the unit, if you don't want to launch the software, or if you want to take advantage of the special built-in functions. There are three button options:
"PDF" will automatically scan to a PDF file. "Email" with scan and automatically attach the file to an email. And "Printer" will, of course, send your scan directly to your printer. They all worked extremely well, with one small, though reasonably insignificant issue: using the email button, it would only allow me to send the attachment with Outlook, not Window Live Mail, which oddly it doesn't support. So, it worked, just not the way it ideally should.
Note too that if you want to scan something very thick, like a book, the scanner has a convenient hinge that lets you fold the lid completely back.
For regular scanning, the Perfection V300 did an excellent job, and the images were very clear and crisp.
But that brings us to the main interest here: its ability to scan photos.
The unit can scan either slides or negatives. A special tray is snapped into the top inside lid of the scanner. You remove the "white backing" cover to get to the tray. (You must keep this white cover off when you scan slides. And must replace it for all other scanning.)
One side of the tray has four slots to insert slides. Flip it end-for-end, and a slot is available for a strip of negatives. Place the tray in the appropriate slots and you're ready.
It's important to note that you can only use Full Auto Mode to scan photos. This makes things easy, but it refers back to the earlier-noted oddity, that the software shuts itself down after a pass in Full Auto Mode. So, you have to keep re-launching it as you scan your pile of slides. It's hardly a problem - it only takes about two seconds, but it would be oh-so much nicer not to have to do it.
It's here that I have my only serious complaint about the Epson V300. More a quibble, but it's annoying and could be a problem if you're not gentle. To hold slides in the tray, each slot has very delicate tabs. This not only makes it a meticulous, tentative process for putting the slides in, but if you're not careful, you could snap a tab off. After several attempts, it becomes pretty easy to get the slides in - but a slot where you could just plop the slides in would be significantly easier. And would have no risk of breakage.
Scanning slides is significantly slower than scanning photo snapshots. There's a previewing process, and at 600 dpi a slide takes about 1:10. (At 300 dpi, it's around 45 seconds.) The full process at 600 dpi for four slides with previewing took around seven minutes. Though not problematic, this is nonetheless quite a bit slower than the times listed in Epson's reviewer's guide. Whether the chart is too generous, or something was slowing my system, I don't know.
That said, this is also all approximate, because it additionally depends on what imaging options you choose. One such option, dust removal, for instance, adds time to the process (though only a very little, and is included in the numbers above). But it did a surprisingly and impressively nice job. Old slides will still need manual retouching, but if you have need of it, dust removal seemed worth the slower timing.
Quality is always an greater issue for scanning photos than documents. In part, this is because the placement of the slides (or negatives) don't lay flat on the scanner window, and so depending on how you insert the slides in the slots, the angles might not be consistent. For most people the differences might not be discernable, but if you have professional needs, that's where discrepancies can show up - and why top end photo scanners can cost so much more.
While the Perfection V300 is not professional grade, its results for photos was wonderful. Images were bright, vibrant and crisp.
I had two glitches scanning photos, both strange - and both bewildering even to the folks at Epson. The first only occurred twice out of a great many scans. In the midst of normal scanning, a horizontal blue line appeared of maybe four or so photos. (Occasionally it was green.) I stopped, started again, rescanned the photos - and everything was fine. The company suspects that a particle might have gotten attached to the mirror, and then eventually fell off.
The other was equally strange and minor. A very few times, I would scan a strip of photos, and everything appeared to be running fine. Except that no scans showed up. The company has no utterly idea what would cause this. But the easy solution was simply re-scanning. And everything then appeared as it should.
Also, it's important to point out that the V300 won't scan "vertical" slides, the image will be cropped. However, instead you just scan a slide horizontally, and it comes out fine, and you then just simply rotate it with any photo editor to the proper perspective.
While the Perfection V300 also scans snapshots - and does a very good job with them - if your main interest is specifically snapsnots rather than slides, the Pandigital is easier, portable and significantly faster. However, the Epson beats it on quality, and is more configurable.
Overall, the Epson V300 was wonderful. Make no mistake, it has some areas that are flawed, most notably the delicate tabs in the slide tray. And I wish the Epson software was slightly more configurable in a few areas. But in the end, these are minor, even including the blue line. (Such things do occasionally happen.) The V300 provides many setting options, is very easy to use for beginners, offers high-end capabilities, and most importantly delivers high quality scanning. But perhaps above all, it provides top-notch photo scanning of slides and negatives for an amazingly low price.
ADOBE PHOTOSHOP ELEMENTS
Once you have your photos all scanned, it's likely you'll want to do some editing of them. There are a few, quite good editors out there, three particular good ones being Picasa (which is a standalone program you download to your hard drive), Picnik (a web-based editor that the Flickr website has partnered with - though you can use it separately from Picasa), and FastStone Image Viewer, a lesser-known standalone program.
Though very good, they're at their best on more simple, though important tasks - changing the lighting, color balance, cleaning up red eye, cropping or retouching blemishes. They're also very simple to learn and use.
If your needs are a bit more advanced however, you'll have to look elsewhere. Adobe's Photoshop Elements 8 - a more basic version of its professional Photoshop SC5 programs - offers features you won't find in the freebies. And some of the features are seriously impressive. Among the newest:
Recompose resizes a picture without distortion. For instance, change a landscape view to portrait size. The software can differentiate between foreground and background objects, which allows images to be compressed closer while maintaining perspective.
PhotoMerge Exposure let's you take two photos with different exposures and combine them for the best shot. (For instance, a night shot which requires flash for the foreground, but which then blots out the otherwise properly-lit background.)
Best Result is a one step adjustment of color, contrast, lighting, and provides a preview before finalizing changes.
Other features include PhotoMerge Group Shot, which will combine the best parts of group photos to make a preferred composite, Smart Brush lets you add effects to specific areas of a photo (like turning the petals of a flower a different color), One-Stop auto fixes that can make teeth a brighter white or the sky a deeper blue, or PhotoMerge Scene Cleaner can remove elements from one photo (like unwanted people walking through an otherwise good shot).
In addition to the editor, Photoshop Elements has an "Organizer," a workspace for handling your photos. Its features include People Recognition, a new Auto Analyzer (which can find your best photographed pictures), and a Smart Album for bringing photos together automatically by user-defined critea such as small groups or closeups. It also comes with 1 megabyte online backup. (The Plus version comes with 20 meg.) One big quibble with the Organizer - it's not as seamlessly integrated with the editor as one would wish, and therefore switching back-and-forth between it and the editor is not finger-snap instant, and it can be a bit of a bother waiting, particularly if you are editing a large batch of photos. However, Organizer does let you do some basic fixes without switching to the editor.

This is all powerful stuff, some of it terrific. Know however that is nowhere as simple as the free programs. A few of the more basic features can be used without instruction, but for most of the rest, and for all the serious features, there is a solid learning curve. To Adobe's credit, they have many tutorials and helpful how-to videos. The program can be bought at the time of writing for $82.
If you are someone who likes the technology of manipulating photos, and have higher-end needs to get your pictures in shape, then Photoshop Elements is a full-featured, excellent product. It also trumps the free programs if you have to do pinpoint editing on just one part of a photo - and also if you are editing a few photos at a time, rather than a large batch. But it costs more than free and requires some learning. If instead, your needs are relatively basic, or if you want to zip through a lot of photos at one sitting, then sticking with free would work just fine.
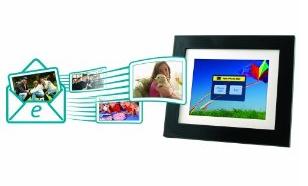
PANDIGITAL 8" PHOTO MAIL ® DIGITAL PHOTO FRAME
Okay, now that you've scanned your photos and manipulated them to look like you want, it's probably nice to actually look at them. And Pandigital has a twist on the standard digital photoframe.
Pandigital has had a line of extremely good digital frames, some reviewed here in the past. What makes this new model different is the ability to send digital photos directly to the frame by email.
Primary, of course, is how are the images, and Pandigital is always quite strong here. Pictures are crisp and clear, with very good color definition.
As for the "twist," the frame comes with a dedicated email address and uses a Photo Mail service provided by ATT. (The address listed on the back of the frame, in case you ever forget.) There's no subscription fee, but you purchase Photo Mail Download Packages. No Wi-Fi is required. To download photos, you press "Photo Mail" on the included remote control, or choose "Photo Mail" from the frame's Home screen. From there, you access the Photo Mail Inbox, with all the download management options. (For instance, you can block photos from specific senders.) Photos can be sent from any source - cell phones, a PC, and the service comes with a built-in spam filter.
For people who snap photos from their cell phone and don't want to be bothered with swapping Flash cards to transfer the pictures or using a USB cord, this is a very direct way of handling things. Plus, it allows a way to directly send photos to a friend or family member's photo frame. That said, I personally think that for most situations, doing a normal transfer or sending a photos to an regular email account is simple enough - and there are no Mail Download packets to purchase. And managing photos on a computer will always be simpler than using a digital photo frame. The Pandigital requires some navigating, it's not just a simple "Send and it's there."
There's one additional feature of the frame that isn't to my preference. The frame will only display photos in a slideshow. There's no way to select a single picture and just have it alone show until you decide to change it. (The closest to a workaround is to set the slideshow so that it only changes every 24-hours.) If you prefer slideshows only, of course, then this would work perfectly for you.
The Pandigital 8" Photo Mail® Digital Photo Frame is well-made and has an extremely good image. And if you're someone who prefers to send your pictures directly to the frame, its Photo Mail feature would be excellent for your needs. But for the reasons noted above, there are other Pandigital Photo Frames in their line I like more, such as the excellent Touch Screen model. It - or some of the other models - might be more worth looking into, unless you specifically want the Photo Mail feature and prefer slideshows only.
"The Writers Workbench" appears monthly on the website for the Writers Guild of America. To see this entire column, with complete product graphics and additional "TWW Notes," please click here