
Too many homegrown tomatoes? Not a problem we're familiar with. The more fruit you raise, though, the more likely some of it will end up on the ground, susceptible to fungus and rot.
While "determinate" varieties such as Romas reach only 4 feet tall or so, "indeterminate" varieties -- think 'Better Boy' and heirloom 'German Johnson' -- tend to push well past 5 feet. And flimsy store-bought tomato cages, often a mere 3 feet tall, aren't up to the job of supporting the plants. Good thing, then, that making your own cages requires very little time and even less skill.
Concrete-reinforcing steel mesh provides the perfect raw material, with 6-inch-square openings that allow easy access to the fruit. Building-supply stores sell the stuff in rolls that are roughly 5 feet high and 150 feet long. Yes, that's a whole lot of reinforcing mesh, but a roll only costs around $100 and yields 25 to 27 cages. So why not get a group together and make a community project of it? The cages, which acquire an attractive patina of rust and can be stacked and stored outside all winter, will last for decades.
Tools and Materials
Leather work gloves
One 150′ roll of 5′ concrete reinforcing steel mesh
2 cinderblocks
2 milk crates
Bolt cutter
Jute twine
2′ wood or rebar stakes (optional)
Instructions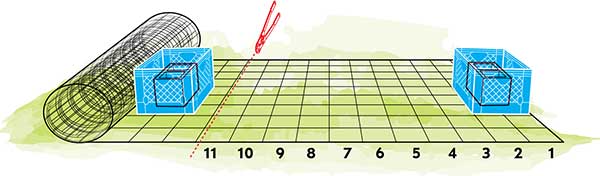
1. Working in a large, flat area and wearing leather work gloves, lay the roll of mesh down, unroll it slightly, and secure the end with a cinderblock in a crate--the mesh is springy. Unroll the mesh to a length of about 8′ and hold in place with a second crate and cinderblock. Count a length of eleven 6″ squares from the end, then use bolt cutters to clip through the very end of the eleventh square, as shown.

2. Remove the first crate and very carefully pull the end toward the (very sharp) cut edge to create an 18″-diameter tube, then fasten in place by folding and crimping the cut edge's protruding prongs, as shown, left. Lightly press down on the cage to ease it into a neat circular shape. Repeat the above steps until you've used the entire roll of mesh to fashion 25 to 27 cages.
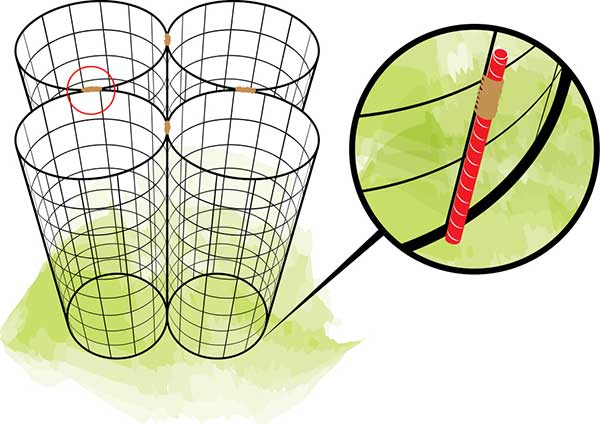
3. Once you've settled on your planting area, stand three or four cages in a snug group and tie their tops together with 3″ lengths of jute twine, as shown. (This will create a larger, more stable footprint, ensuring the cages don't blow over.) If you're using fewer than three cages, drive a 2′ wood or rebar stake halfway into the ground at the outside base of each cage and secure the top of the stake to the cage with twine.